Crispy Shrimp Sushi Tacos (Air Fryer Nori Shells!)
Introduction
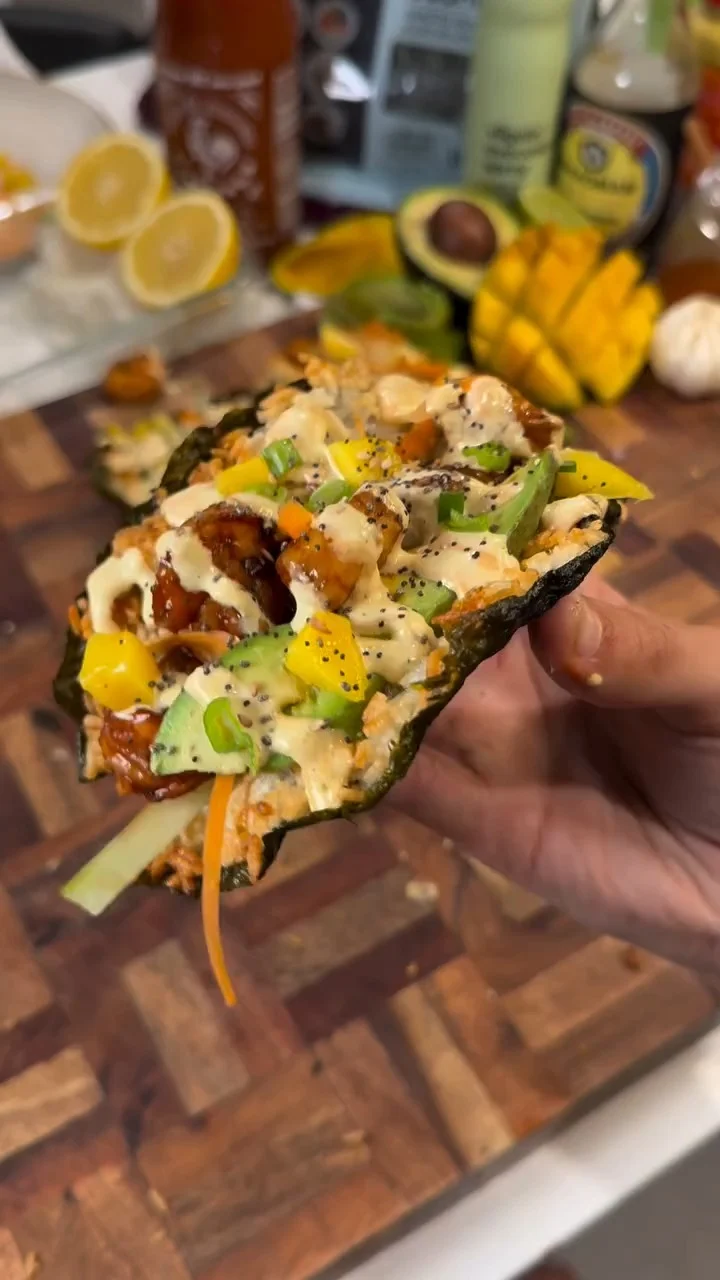
I’ll be honest — the first time I saw a sushi taco, I thought it was just another pretty food trend with no real payoff. But once I actually made them? I completely understood the hype. These crispy shrimp sushi tacos are everything — crunchy nori shells, golden air-fried rice, bang bang shrimp, creamy avocado, fresh mango, and a drizzle of sriracha mayo that ties it all together. They look absolutely stunning on the board and somehow taste even better than they look.
What I love most is that these are genuinely approachable. You don’t need any sushi-rolling skills, no bamboo mat, no technique. It’s basically just rice in a nori shell, air fried until it crisps up, then loaded with your favorite toppings. When I make this for guests, the reaction is always the same — shock that it came together so quickly, and then quiet focus while everyone eats.
In this post, I’m walking you through every step — from cutting the nori circles to loading up that final taco with all the good stuff. Whether you’re a sushi lover or someone who’s never touched nori before, you’ll nail this on the first try.
Why This Recipe Works
The magic here is really in the technique. Air frying the rice directly on the nori does two things at once — it crisps the rice to a golden, almost crackling texture while softening the nori just enough to fold into a taco shell without cracking. You get this incredible contrast of crispy rice on the inside and slightly chewy nori on the outside. Add bang bang shrimp, fresh vegetables, and fruit, and every single bite has something going on. It’s also endlessly customizable, which means no two tacos at the table ever look exactly the same — and people love that.
Crispy Shrimp Sushi Tacos — Everything You Need to Know Before You Start
I’ve made these a handful of times now and I’ve learned a few things the slightly hard way. The most important one: fold the nori shell while it’s still hot. Don’t wait. The moment it cools, it firms up and trying to shape it will just cause it to snap. One mistake I made early on was letting the shells sit on the counter while I got distracted prepping toppings — ended up with flat rice chips instead of tacos. Hot shell, fold immediately, then let it cool in that folded position. That step makes or breaks the shape.
Also, I still prefer using jasmine rice over sushi rice for this. Sushi rice works perfectly fine, but jasmine gets a better crisp in the air fryer and the flavor is a little lighter, which lets the toppings shine. Could be just me, but I’ve tested both and jasmine wins every time.
Ingredients Needed
For the Sushi Taco Shells
- 4 full-size nori sheets — cut into circles using a bowl or round cutter as a guide. You can find these at any Asian grocery store or online.
- 2 cups cooked jasmine rice — or sushi rice. Cook it slightly drier than usual so it crisps better in the air fryer.
- Neutral cooking spray or a light brush of oil — optional, but helps with browning.
For the Bang Bang Shrimp
- 300g (about 10–12) medium shrimp — peeled, deveined, tails off
- 2 tbsp sriracha
- 1 tbsp soy sauce (Kikkoman works great here)
- 1 tbsp honey or brown sugar
- 2 cloves garlic, minced
- 1 tbsp neutral oil
Toppings
- 1 ripe avocado, thinly sliced — the creamier the better
- ½ mango, diced into small cubes — adds a sweet, juicy contrast
- ½ cucumber, julienned into thin matchsticks
- 1 medium carrot, julienned or shredded
- 2 tbsp cream cheese, softened — spread directly on the warm rice shell
- 3 green onions, thinly sliced
- 1 tbsp black sesame seeds — for garnish and a little earthiness
Sriracha Mayo
- 3 tbsp Japanese mayo (Kewpie is ideal, but any mayo works)
- 1–2 tbsp sriracha, to taste
- 1 tsp lemon juice
Step-by-Step Instructions
Step 1: Cut Your Nori Into Circles
Lay your nori sheets flat on a cutting board and use a large round bowl (roughly 6–7 inches in diameter) as a guide to trace and cut circles. A sharp knife or kitchen scissors work well here — scissors honestly make this way easier.
You want the circles to be generous enough to hold a good amount of filling once folded. Don’t stress too much about perfect edges. Once these are loaded up with toppings, nobody’s looking at the edges anyway. Plan for about one nori circle per taco.
Step 2: Spread Cooked Rice Over the Nori
Take your cooked rice — still warm is totally fine — and spread it evenly across the nori circle. Use slightly damp hands or the back of a spoon so it doesn’t stick to you. You want a fairly even layer, maybe half an inch thick, leaving just a small border around the edges.
Press it down gently so it adheres to the nori. It should look like a little rice disc. At this point it doesn’t look impressive at all — I always laugh a little — but just wait.
Step 3: Air Fry the Rice-Topped Nori
Carefully transfer your rice-covered nori circles into the air fryer basket, rice side up. Air fry at 375°F (190°C) for about 8 minutes. What you’re watching for is the rice turning from white and fluffy to a deeper, golden-toasted color on the surface.
The edges might brown slightly faster — that’s fine. If you want extra crunch, hit the broil function for another 1–2 minutes at the end. The nori will darken and become slightly stiff, and the rice will take on a gorgeous golden crust that smells absolutely incredible.
Step 4: Shape the Taco Shell — Do This While It’s Hot!
This step can be a little annoying if you rush it in the wrong direction — meaning, if you wait too long, the shell firms up and won’t fold without breaking. The second the nori comes out of the air fryer, fold it in half gently along the middle, rice facing outward, like a taco.
Hold it in that folded position for about 30 seconds, then set it down and let it cool completely in that shape. As it cools, it holds the taco form perfectly. You’ll end up with this beautifully crispy, shell-shaped sushi taco that actually holds its structure. It’s satisfying every single time.
Step 5: Make the Bang Bang Shrimp
While your shells are cooling, get the shrimp going. In a small bowl, mix together the sriracha, soy sauce, honey, and minced garlic. Heat a pan over medium-high heat with a little oil and cook the shrimp for about 1–2 minutes per side until they turn pink and start to curl.
Pour the sauce over and toss everything to coat. Let it cook another 30 seconds until the sauce thickens slightly and glazes the shrimp — you want them sticky, shiny, and deeply sauced. Pull them off the heat. The smell at this point is genuinely distracting.
Step 6: Mix the Sriracha Mayo
This takes about 30 seconds and it’s worth not skipping. Just whisk together your mayo, sriracha, and lemon juice until smooth and creamy.
Taste and adjust the heat level — I usually go heavier on the sriracha than the recipe suggests, but start somewhere in the middle and build from there.
Transfer to a squeeze bottle or small piping bag if you want to drizzle it nicely. Honestly even a spoon works fine.
Step 7: Fill and Build Your Tacos
Now for the best part. Open up your crispy nori shell and start building from the bottom. First, spread a thin layer of softened cream cheese right onto the inner rice surface — it acts like a little base that everything else sticks to and adds a rich, tangy creaminess.
Next, tuck in your cucumber sticks and shredded carrot so they lean up against the sides. Add two or three bang bang shrimp right in the center, then layer on a few slices of avocado and a small handful of mango cubes.
Finally, drizzle the sriracha mayo generously over the whole thing, scatter over the green onion, and finish with a pinch of black sesame seeds. Try not to eat it immediately — just for a second — because it’s worth admiring.
Final Dish Presentation
These tacos are best served immediately after building, while the shells are still crispy and the shrimp are warm. Line them up on a wooden board or slate and they look honestly stunning — the golden-brown nori, the jewel-toned mango and avocado, the glossy shrimp, the white cream cheese, and that zigzag of sriracha mayo.
I like to serve them with extra sriracha on the side and a few lemon wedges for squeezing. People will absolutely take photos before they eat them. Plan for it.
Occasions to Serve
These are genuinely perfect for any occasion where you want to impress without spending all day in the kitchen. I’ve made them as a fun weekend lunch, as a dinner party appetizer, and even as a “fancy Friday night at home” dinner.
They’re great for sushi lovers who want something different, and they’re a brilliant option when you want to serve something that feels elevated but is actually pretty stress-free. Game nights, date nights, or even a solo dinner where you just want to treat yourself — these always deliver.
Cooking Tips
- Use day-old rice if you can. Freshly cooked rice can be a little too moist and may not crisp as evenly. If using fresh rice, spread it on a sheet pan for 10 minutes first to let some steam escape.
- Fold the shells immediately. I can’t stress this enough. Hot nori = flexible. Cool nori = brittle. Work fast and have a spot ready to rest them in shape.
- Don’t overcrowd the air fryer. Cook the shells one or two at a time max, depending on your basket size. Crowding causes steaming instead of crisping.
- Pre-prep everything before you air fry. Once those shells are done, assembly goes quickly — having all your toppings sliced and ready makes the whole process way smoother.
Variations
- Salmon instead of shrimp — use thin slices of smoked salmon or seared fresh salmon with a teriyaki glaze.
- Spicy tuna version — mix canned or fresh tuna with mayo, sriracha, and a little sesame oil for a classic sushi filling.
- Vegetarian swap — skip the shrimp entirely and go heavy on the mango, avocado, edamame, and pickled cucumber. Still incredible.
- Add tobiko or masago — a little fish roe on top adds a beautiful pop of color and a briny ocean flavor that really elevates the whole thing.
Serving Suggestions
- Serve alongside a simple miso soup to lean into the Japanese-fusion vibe
- Pair with an edamame and cucumber salad with sesame dressing
- Set out small dishes of extra soy sauce, sriracha, and pickled ginger for dipping
- Cold sparkling water with lemon or a light lager works beautifully as a drink pairing
Storage Tips
These are genuinely best eaten fresh — like, within 20 minutes of building them. The nori shell will start to soften as it absorbs moisture from the toppings over time, and you lose that glorious crunch. That said, you can absolutely prep the components ahead. Keep the cooked rice, shrimp, and sliced vegetables in separate airtight containers in the fridge for up to 2 days. Air fry the shells fresh when you’re ready to eat and assemble right before serving. Leftover shrimp reheats well in a pan over medium heat for about 1 minute — don’t microwave them or they’ll go rubbery. The sriracha mayo keeps in the fridge for up to a week and honestly goes on everything.
I keep coming back to this recipe because it genuinely never gets old — the crunch, the creaminess, the heat, the sweetness from the mango — every element earns its place. Once you get the shell technique down, which takes one batch at most, the rest is just fun. Make them once and they’ll absolutely become part of your regular rotation.